Thursday, December 15, 2011

Homemade Gifting


I posted previously about this idea for homemade mugs and it just seemed like a great gift idea.

I went to Goodwill and picked up two white mugs and for family night we set to work.  Luckily my husband has a collecting bug so we had basically every color of permanent marker available on the market.  In the original post I got it from they just used black markers but I thought color would be more fun for the boys.

I also took some creative liberties with the directions and instead of using carbon paper to trace the pattern on the mug I used masking tape and a scrapbooking cutter dealie (not really sure of the official name of the thing, a razor blade I guess) and cut out the letters to create a negative space cutout of the letters we were doing.
(does that make sense?) I figured that would make it easier for my little guys (3 1/2 yrs old and 18 months) to keep things looking like letters.  It worked like a charm and they just colored to their hearts' content and then we peeled off the tape and there were the letters.

It was a fun project and I think my little C had a great time doing it.  Highly recommend this activity.

Thursday, December 8, 2011

Ideas for a homemade Christmas: Design Mom via SouleMama

Peek (1)
Image from SouleMama.com
I saw this really cute idea over on SouleMama yesterday and I thought it would make a great Christmas craft for my kids.  Here's the original link up over at Design Mom.

I think when we try it I might try to use contact paper or maybe even a wide masking tape since my guys are so little.  I don't know that the carbon paper would work for us.

A season of hope and miracles


This morning an old friend from high school is giving birth to her sweet baby Anna Joy.  This pregnancy started as a miracle and despite the bumps in the road, we pray for another miracle today.  Their faith is so inspiring and as a mother, particularly a pregnant mother her story is particularly precious and heartwrenching.  She's been on my mind all morning as I'm praying for strength for all that my friend and her husband will be facing today.

If you feel so inclined, read her story and join me in prayer for this sweet little family.


Wednesday, November 23, 2011

A new baby snuggler


The other day I was at the fabric store looking for some great fabrics to make a snuggle quilt for a new little baby girl of a friend of my parents.

I saw this whole line in a little shelf and fell in love immediately.  I bought a quarter yard of each right there.

We were going to be with my parents for Thanksgiving so it would be a great time to pass it on to her rather than having to wrangle two little ones at the post office to mail it so I stayed up late last night to finish it.


I really liked the end result.  Its not as large as a typical quilt and not as small as a typical snuggle quilt.  I like to think of it as large enough for a little one to sit under and snuggle with but small enough to tote around without being too cumbersome.


Minkey is a tricky and stretchy little monkey to work with and because of that and the fact that I didn't stop and iron like I usually do it ended up a little scrunchy which I actually kind of like.  It gives it a puffier look without adding the weight of puff.


Its super soft and snuggly and I think this is going to be the pattern for a baby quilt for our new little one.

Back in the saddle..


Lately the blahs and the blech's of that first trimester of pregnancy have been letting up a little and I can feel my spark back.  I've started having little ideas of projects I might like to pick up again.

And it feels good.

A week or so ago Joshua brought home a box of blank lab coats for a friend of his from work and asked if I'd embroider the doctor's name on them.  Josh ordered some for himself a month or so ago and I guess he's started a trend at the clinic.  


It felt good to bust out the embroidery machine and get to doing something creative. 

And that gift certificate the doc gave us for doing it for him will be fun to spend together too.

Here's to starting to feel like myself again!

Friday, October 7, 2011

The Cog and Wheel: Complete!

And just to show that there's no need for concern from my last post, here's the Cog and Wheel.
Did I sound depressed or something in my last post?  My dad called this morning to make sure I was okay after reading it so maybe I did?  Unintentional I assure you.  The truth is I'm 7 weeks pregnant and feeling a serious case of the blahs.  This happened with my last two pregnancies.  The first trimester it seems all my creative energy gets poured into my uterus instead of my sewing machine.

Never fear, it passes along with the first trimester.

Anyway.

 Here she is!  Complete and all quilted up and ready for snuggling sweet little ones in.

I love how bright and cheery it turned out.  The yellow felt a little risky but in the end, I really like it.

And while we're here, let me take a moment to draw your attention to the book on my nightstand


This one.  Its called 31 Dates in 31 Days and it was written by a friend of mine from my NYC days.

Check it out here on Amazon.  Its fantastic, a true story and will leave you feeling like you just spent time with your best girlfriend in some great girl talk.

And here she sits in her new official spot in the playroom.  She's the snuggle with mama on the rocker and read quilt.

We're all quite glad she's finally done!

Today I'm linking up with:
  Ladybird Ln  

Thursday, October 6, 2011

Oh hold...

Hey there my friends,

So lately it seems blogging and really sewing for that matter just seem to be far from my mind.  I thought it was just the summer, maybe it started out that way but now, well, we just seem to have other things going on.  You all know how that goes.  My sewing ferver seems to ebb and flow sometimes and lately, its been ebbing.  So rather than be wracked with guilt Saturday mornings when I realize I forgot Finished It Up Friday, I'm just going to say, until further notice, we'll just be doing the random regular blog post as I finish up little projects here and there if I have the energy to get the picture taken:)  For heaven's sake I've had my Cog and Wheel quilt done for a week and a half and just don't seem to ever get the umph to get some pictures taken!

Anyhoos.

So for now, the boys and I are busying ourselves with homework pages and worm hunting and napping but we'll check in here and there.

Thanks!

Tyra

Tuesday, October 4, 2011

A cause near and dear to my heart...

Two years ago my mom was diagnosed with a very early stage of breast cancer. She assured me that she would be fine, they'd caught it very soon and they would be able to treat her fully and there was really very VERY little risk of all our worst fear, losing her to this disease, yet I still found myself terrified.  New treatments were available that allowed her to experience very few side effects and to rest assured that her risk was pretty minimal. A time like that makes you grateful and also very aware of the many women who are not as fortunate in their diagnosis as my mom.  It makes me grateful for the many people who made donations so that the research could be done that led to the discoveries of the treatments that benefited my mom.

There's still such a long way to go and this month being Breast Cancer Awareness Month today we've got a guest post from Nanahood, to whom breast cancer awareness is particularly important.  See her regular posts at nanaood.com.


TELL SOMEONE YOU LOVE

Every where you go you see pink ribbons, reminding us to get a mammogram but I am not convinced that everyone who needs one-has had one.
A few weeks ago I spoke to a group of ladies at a church and I asked them how many of them had had a mammogram this year. Hands were raised. Then I asked how many should have had one this year but had not done so. They didn’t want to raise their hands, but some did. Later at lunch a lady explained to me why she hadn’t. She had an appointment then someone in her family had a crisis and she had to cancel it. So far she hadn’t found the time to reschedule.
That’s the way we are…
We take care of others and forget our own needs.
I asked the women there to please remind their friends, sisters, and moms to have a mammogram and they promised they would. Now I’m asking you? Have you had your mammogram? If you haven’t go make your appointment NOW!
Then call every important woman in your life and make sure they have had theirs. You never know. You might just save a life.
You have to click through these photos (I think). They don’t automatically change.
Click to play this Smilebox scrapbook

Tuesday, September 27, 2011

Nanahood Guest Postage

Good morning friends!

Today I've got a guest post over at Nanahood.com about my grandma quilts I made a few weeks ago so head over and check it out!

Friday, September 16, 2011

Finished It Up Friday {#12}

Hello!  As promised, we're back!  For my own Finished It Up I would like to share this rice bag I made for my dad.  Its his birthday this weekend and the old rice bag I made him was getting pretty shabby.


Kinda fun.  Super easy.

Now its your turn for a little show and tell.


Tuesday, September 13, 2011

A little surprise....

Last Saturday the boys and I went to Concord to a graduation party.  When we called Joshua as we were heading home he said, "tell Carvie I have a surprise for him when you get home."

"what is it?" I asked.

"A bird." he said.

Right I thought.  Its probably a chocolate bird or something.

We arrived home and Josh greeted us with a little shoe box and it it, sure enough, was a little green bird.

As he opened the box the little bird flew off and perched above our front door.  Josh had found him in our garage and caught him and kept him in the shoe box so Carvie could see him and they could set him back free together.

That little guy didn't want to be re-caught and we had to chase him around the upstairs a bit before he finally let Josh catch him with Carver's little dollar store butterfly net.


Carver was in hog heaven and thought it was so cool.


The little bird was so sweet and once Josh had him in his hand let him hold him without freaking out or anything.  Which kind of made us wonder if he was really someone's pet bird?

Josh told Carver that birds were meant to be outside so we had to let him go back to his mama and daddy.  So outside they went and we set the little guy free.

Fun little adventure for a Saturday afternoon!

A new project....


I've been trying to make something to put on my downstairs wall and keep starting projects thinking for it but they never seem to be quite right.  Usually my biggest problem is that they are usually just too bright or two busy.

So I'm trying something a little more simple.  Still kinda busy, but only two colors so maybe this one will work...

We'll see!  At any rate, its always fun to have a new project on the machine to work away at little by little.

Friday, September 9, 2011

Finished It Up Friday (remember me?) and a vintage inspired star quilt


Oh yeah.  Remember this little linky party?

What with the whirlwind of summer time, I really barely did.

So sorry.  I really hate to be such a flake about things.  But really.  I have a firm belief that my bloggery has to come second to tending the little monkeys and, well... life really and so thus I have let a few bloggity things slip.

Like our linky here.  But never fear.  We're back.  Or at least we'll officially be back next week.

Okay?

In the meantime I have one little finished it up number to share with you today.  The same time over the summer that I made it to the long arm rental I quilted this beauty up as well.  Before Mady left for the summer she declared this to be her current favorite family quilt.

I must admit this is a favorite of mine as well.  Particularly because it is a design of my own.  And I'm a sucker for vintage inspired prints.

And then there's the matter of this little rascal who decided to be my photography assistant this afternoon.

So tune in next Friday for a chance to share your finished up projects..

See you then!

Sunday, August 28, 2011

For the love of grandmas....

For the last few weeks I've been working away on two projects for the same new grandma.

One of my mom's best friends just became a grandma this summer.  She initially asked me to create a quilt for the baby and then in secret my mom asked me to create a "grandma" quilt for her friend to keep at her home to be the special snuggle quilt at granma's house.

The first quilt for the baby came together easy.  I love the fabrics and I loved how the embroidery came together on the back.  I just loved it.


I really struggled with finishing up this little number.  I loved the top but couldn't find the right back for it.  I finished the other one first and called my mom to tell her that I loved the baby's quilt more than hers.  I just couldn't finish it up in a way that I loved.  Then I decided to try a different way to finish it by just folding the backing over.


And now I love it too.  LOVE IT!  It has a SUPER high snuggle factor.  Like a 10 out of 10 snuggle factor.

I google translated a bunch of different ways to say grandma and appliqued them on to the front of the quilt.


Mom had the shower this weekend and presented her friend with both.  Yay!  

Today I'm linking up with:  
  {Sew} Modern Monday at Canoe Ridge Creations   The Girl Creative


Friday, August 26, 2011

Cog and Wheel Quilt-A-Long {Part 3}

Please forgive the delay.

I really can't offer much of an excuse except that these days my day job 
(mama to these monkeys)
has been keeping at off site locations like the park and swim lessons and running up and down the street.  In other words away from the sewing machine and the computer. Which is a good thing!

But enough is enough so without further ado, lets finish this up!

FINISHING THE COG AND WHEEL

Lay out blocks.

To sew them together, match up the seams in the middle of the block to make sure everything lines up.


Sew all the blocks together with a 1/4 inch seam

If you are doing the twin sized quilt, you are done.  If you are doing any of the others, take your boarder pieces and following the cutting/sizing directions in the pattern, sew on the boarder to the top and bottom of your quilt top.

At this point make sure to iron up the top once you have it all sewed together.  With all the curvy sides a good iron job will make sure everything gets nice and flat.

If you are planning to machine quilt this guy on your own machine or hand quilt its time to, create your quilt "sandwich."
Lay out your backing, then your batting on top of that and your quilt top on top of that. 

With each layer make sure you smooth out all lumps and bumps.  I like to use a spray baster to lock the fabrics in place.  Depending on how large your quilt is, go ahead and baste with thread as well.

If you plan on using the quilting pattern in Denyse's actual pattern, now is the time to take it out. 

In order to trace the pattern onto the quilt top a great demonstration of the method can be found here.

I've yet to decide how I want to quilt mine and also yet to find the right fabric for backing it so I don't have a finished product to show off.  Here's the top though!


Good luck finishing yours!  When you do I'd love to see!

Sunday, August 14, 2011

A delay and a little show off.....

Today was supposed to be our next installment of our Cog and Wheel Quilt-A-Long

But I'm afraid the week has gotten the better of me and I am not really any closer to being ready to start the finishing work on this quilt than I was this time last week.  What can you do.  I suspect maybe any of you who are quilting along might be in the same boat since a week is kind of a short amount of time to get all those blocks together unless you are doing a baby quilt in which case I suppose you'll still understand.  I've got two custom orders to work on that need to be finished and then there was the matter of finishing up this little beauty above that was begging me politely to finish the quilting and get it bound so I could get it on my bed.

So there you go.

And there she is.  All finished!  I'm so happy to have it finished and laid out nicely on my bed.  I love it.  I REALLY really love this quilt!

Now I think it needs some colorful throw pillows.  Put that on the long list of projects I want to do....  It will also take some convincing since the husband isn't a fan of throw pillows.... we'll just have to see about that!

yay for me:)

We'll recommence together this time next week for some finishing work on our Cogs and Wheels......

Sunday, August 7, 2011

Cog and Wheel Quilt-A-Long {Part 2}

Hello!  This week we'll go over piecing.  This really is the tricky and most intimidating part. 

Once you have down the technique for curved piecing, you'll think to yourself, 

"oh my this is fantastic! give me more curves!  Bring on the Single Girl!"

You'll laugh in the face of a double wedding ring.  Right in its face.  I promise you.

But back to the matters at hand.
our Cog and Wheel.

Step 1: LAY OUT YOUR BLOCK
I find that laying out my block is a must for the cog and wheel.  Usually I'm not really interested in strictness in laying things out before I sew and as you might expect, I often end up with blocks pieced in all sorts of "new and creative" ways that I didn't intend.  Sometimes this is nice, not so much with curved piecing.  I also recommend putting on an episode of Say Yes to the Dress on your iPhone as you can see I did.  Each block is two and a half episodes for me:)


Step Two: PIECING THE CENTER STRIP
It doesn't really much matter which section you do first but I look at them as five sections illistrated below to keep my brain from tying in a knot and getting things sewn on wrong sides or upside down.  It also allows me to chain piece to a certain extent which moves the process along a tad too.

Section 1 would be the center strip (or pieces 2 and 4 in your pattern)  The top of piece 2 is curved and matches the bottom of piece 4.  When you try to put right sides together to sew it, they obviously don't match up because of the curve so start by placing the right sides together, lined up just matching up the ends as pictured.  Stitch a few stiches and then put your needle down and lift your presser foot. 


Adjust the next small section so that it matches up and sew a few more stiches.  Continue this process till you get to the end.  The end will be a little tricky and you will have to sew and really hold the ends together slowly but don't get too caught up on perfect matching up here.  This piece is pretty forgiving.

CAUTION:
I'll say this a million times more for this part.  Because you are sewing with fabric cut on the bias (against the grain of the weave of the fabric) it is super stretchy and easy to really pull the fabric out of shape and end up with extra or short on a side.  Just bring the fabric up to meet the piece you are matching it up with gently.  A teeny tiny 
tug is okay but don't pull or stretch.

Step 3: Piecing the curved sides
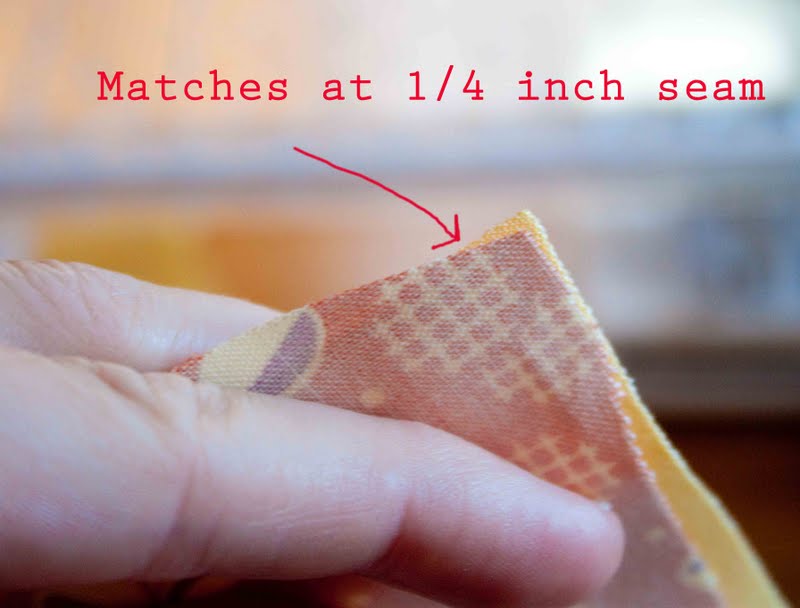
Sections 2 and 2b are easy and match up like any square piece would except on the curved end you will find that the piece of the fabric that matches up is on the point of the fabric that will be the 1/4" seam.
(see below)
If you start sewing on the curved side, that's what will match up.  If you are sewing on the 90 degree angle side, it matches up like any square piece does.


Once you sew it, it is even on the curved sides
(see below)

Sections 3 and 3b are the same in that you just make sure the places the fabric matches up is where the seam will be at 1/4 inch. (the pictures above are from piecing sections 3 and 3b).  These two parts really lend themselves well to chain piecing.

Once you have all five sections pieced together, its time to turn them into three parts from the five.  You will sew sections 2&3 together and 2b&3b together.

Step 4: Piecing your first big curves
Lay them out again like so.

Fold them in half and pinch the crease to mark it.  
Match the crease and pin it.
Match the seams and pin those.
Continue to pin in half and match creases until pinned all the way.

CAUTION:
To all those out there who are not usually big pinners, let me take this moment to encourage you to pin just this time.  Again because you are using fabric cut on the bias, it is WAY to easy to stretch and pull the fabric so that you end up with things way off and not matching up.

JUST PIN IT!

 Step 5: Sew ALL sections together
This is the easy one.

Step 6: Sewing the outer corners onto the inner circle

Take four corner pieces and sew them into a circle.  It will look like a square that just had a circle cut out of the center.

Fold center circle into half and then fourths  to crease fold to mark centers of pieces. You can even throw a pin onto each of these creases to mark them and be ready since you will be pinning together there shortly.


Match up the seams of your outer corner piece to the crease in the center of your inner circle piece 
(pictured below)

Create the same fold/crease in the center of your next patterned piece (piece #4 in the original pattern) and make a correponding crease in the middle of the outer corner piece.  This can be done easily by folding the corer in half as if it were a square)


Once you do that all the way around it will look like this.  May I just take this opportunity to really encourage you to pin this really thoroughly all the way around.  It will make it much less likely that you will end up with puckers or pockets where the fabric bunched up or stretched.  
Pinning is way less tedious that picking out your stitches.

something about this picture makes me want to bake an apple pie.....

Once you get that bad boy all pinned up you can just sew all the way around.  Take time and go slowly to keep things from bunching as again, bias cut fabric can be persnickety. 


There you have it!  You're done!


Tune in next Monday for finishing......

Related Posts Plugin for WordPress, Blogger...