Wednesday, March 9, 2011

WIP Wednesday: Exhibits A through F of my quilting ADD

This weeks WIP shows my serious quilting ADD.  Turns out I have six current works in progress.  And actually there's more but those are so not getting worked on right now, I'm not going to count them.

I think this happens when I set out on big quilts because every once in awhile I need a quick shot of "finished product" to keep me going.  This single girl is taking time (which is fine, I do love my single girl) and I think she's the catalyst for all this frenzied small projecting.

Or maybe I just can't ever shut my brain off and get too excited about all the fun quilts there are to make.

Maybe a combo of the two?

Anyhoos.

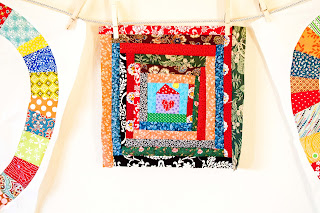
Here's a new project that has been percolating in my brain for a few weeks and has now jumped into the actual hands on creating process.  This will likely be a long-term ongoing quilt too.  In our Relief Society room at church we have this leftover basketball hoop studdery on the wall right up front.  Lovely it is not and the other night at craft night our president asked me if I might be interested in creating a little something to cover up the basketball hoop leftovers.  Of course!  So I thought it would be fun to have the other sisters help in creating a project.  The assignment will be to create a quilt block representing your favorite hymn and I've dubbed her the Hymns of the Restoration Quilt.  
We'll call that name a WIP too since it sounds a little stuffy to me.

Mine is Love at Home.  I don't know if its my favorite hymn per se but I do really love it and I think it makes for a sweet quilt block
"there is beauty all around, when there's love at home...."

I've also been really wanting to do a postcard quilt ever since I saw this one in American Patchwork and Quilting a year or so ago.  I got some great fabrics from the bargain garden at the quilt show last weekend that were perfect.  So last night when my husband was using the computer when I was going to blog, I figured  well I'll just do something else till he's done.  And so I busted out four postcard blocks.

I'm calling this one Postcards from Granny because the fabrics sort of remind me of grandma prints.  And when I quilt, I often think of my Grandma Sampson who was an avid quilter and I miss her sometimes.  Quilts are her postcards from Heaven to me.  Corny, yes.  True, yes.

I'm loving them so far.
I've really been wanting to create a larger quilt to hang on this blank wall in our family room and I think this postcard quilt will be great here when it's done.

And then there is this corner of WIP's

I've been plugging away here and there on my little hexagon quilt.  This is such a nice little something to do while I sit outside on these nice, sunny pre-spring days with Carver while he rides his trike up and down the street. 
 I think its doubled in size this week.    

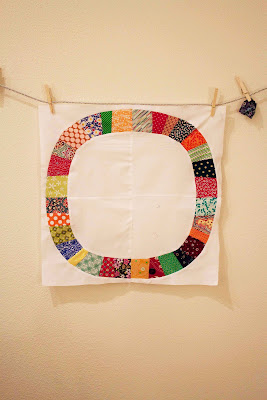
Here we have my leftover blocks from Little Nellie's raw edge circle quilt.  I'm thinking I'm going to put them together and make my own bottom of the pack and play quilt for Asher.  I have some red minky that I think I'll use for backing.

The other project pictured here is a pile of blocks I made with the leftovers from another quilt.  I'm still not sure what I want to do with those blocks.  I've got writers block for quilts (quilter's block?) on that one so its in a holding pattern for now.  But it IS on my mind to figure it out so I figured we'd let her sit in on the photo shoot.

Phew!  So there you have it.  

WIP Wednesday at Freshly Pieced

Tuesday, March 8, 2011

Fixed it

For any of you who have been so kind as to add my button to your blog list, (thanks by the way) it was brought to my attention that my button code was leading folks to the wrong blog.

Woops!

Anyhoos, its been fixed and so if you HAVE added my button, you'll need to swap out the codes.

Sorry for the mix up.

-Tyra

::raw edge appliquéd lettering::

I thought I'd do a quick little tutorial on the appliquéd raw edge lettering I used on little Nellie's quilt. 

Its easy as a wink and can be used on lots of projects like this one for my son's 3rd birthday shirt.

Supplies
fabric
coordinating thread
tear away stabilizer
embroidery scissors
computer, printer and paper
pins
Straight edge ruler

OPTIONAL BUT NICE TO HAVE:
Edgestitch foot: #10 for those of you lucky folks with a Bernina

::Step 1::
On a word processing program print out letters you need.  I was doing "lil'nel" so I printed out l, i, n, e and an apostrophe.  Letters can be reused so you don't need to print out the whole phrase.  I used a 300 point font and bolded it to make the letters thicker.

::Step 2::
Cut out letter sized squares/rectangles from your fabric.  
Place letters backwards on the wrong side of the fabric  
You can trace them or just pin them.  Curvy letters are worth taking the time to trace.  For the straight letters, I just pinned them on and cut around them.  The letters don't have to be perfect since the idea is that the edges will fray once washed anyway.  

Its better to error on the side of cutting around the letter than cutting it too small.


::Step 3:: 
Cut out an appropriately sized piece of stabilizer and place it under the 
fabric you are going to sew the letters on. 

::Step 4::
Lay out the ruler to the line where you want the lettering to go along and then place the letters along the line.

::Step 5::
Once the letters have been laid out, pin them in place.


::Step 6::
If you have an edgestitch foot, now is the time to put it on.  
Let me take this opportunity to sing the praises of the edgestitch foot.  This makes it SO easy to make really clean and straight lines when you edge seams or appliqué fabrics.

::Step 7::
If you have an edgestitch foot, you are going to want to move your needle over all the way to the left.

::Step 8::
Set your needle to the needle down position. 
This will make it easier to turn as you sew along the edge of your letters.

::Step 9::
Sew along the edge of each letter.

If you have little dots on your i's or j's, don't worry about sewing a circle around it.  those little guys can be stitched all over which makes it a little easier for them to keep a nice dot shape once washed.  

Also if you are using a font that has little flags on the l's or i's or j's or any other letter, you are going to want to make sure that you sew ALL the way to the edge of the letters so that they hold their shape once you wash them.  Once you wash it, the fabric frays so you can't really see much of the thread lines anyway.  Its more important that you get all the details of the letter/number sewn down so that it holds its shape once washed.

::Step 10::
Tear off the stabilizer G E N T L Y

::Step 11::
I appliqued my letters on a separate panel and then sewed that on my main fabric backing.  It's easier to work with a smaller fabric as you go through the turns, tracing the lettering.  But its not necessary.

And there you have it!


Monday, March 7, 2011

For Baby Nellie or lil' nel


This weekend I finished the last of this round of baby quilts and this one goes to baby Nellie .

I had been wanting to try this raw edge circle quilt ever since I saw Allison's tutorial for it over on her blog

Have you ever stopped by there?  
If not, you really should.  

Its one of my favorites.

Here's the full front view.  Its pretty small.  Nellie's mama told me that Nellie's been using her big sister Jane's Auntie Tyra quilt laid out on the bottom of her pack and play so this is (almost) pack and play dimensions.  Its also a good size to drag around once's she's on the move.

All the fabrics are leftovers from my Single Girl fabrics and I'm quite happy to say that I didn't purchase one square inch of new fabric or even batting for this quilt.  
Although I really love the fabrics used in Allison's original.  
If I could go back in time I would buy out the American Jane Recess line and hoard it forever.
I've been LOVING Nettie's curved corners over at A Quilt Is Nice and had to try them out on this guy.

I didn't take the time to make true bias binding tape and I think next time I will.  It turned out fine but the corners do have a slight pucker to them because I didn't take the time to do it.

Nettie seems to have been particularly inspiring to me this week because I also tried out her quilting straight lines tutorial for my quilting design.  I really like how it turned out and it was nice to depart a little from my typical stippling.

There is something so sweet and quaint about a baby named Nellie such that I can't hear her name without hearing in my mind poems about little girls with ringlet curls referred to as lil' Nel.

So I put lil nel on the back to mark it as her own.  In a home with three older sisters I'm sure she'll need help claiming things once in awhile.
I really liked how it turned out and it came together quite quickly once I got going on it.  A nice distraction from my pile of single girl curves beckoning me.  Sort of cleansed the palette and now I'm ready to dive in for some more.


Today I linked up with:

{Sew} Modern Monday at Canoe Ridge Creations

Wednesday, March 2, 2011

Work in progress Wednesday!

WIP Wednesday at Freshly Pieced

I linked up to WIP Wednesday over at Freshly Pieced.

My work in progress is of course my Single Girl which I think will be a WIP for awhile.  I added a little button on my sidebar to track my progress.


I'm hoping to get these little babies sewn today as it is a stormy day in Santa Cruz and we're hanging indoors. They are single girl blocks that I pinned at craft night last night.

This is a two-fer WIP as my little inspiration wall is a work in progress that I just added above my sewing desk and finished a hexagon block.

Still loving on these hexies.

Click on over to Freshly Pieced and see what everyone else is doing!

The pull

Tonight was craft night up at the church and as usual I stayed way too late laughing, story telling and eating eclairs and orange slices.  And I happened to get a little work done on pinning my single girl squares but the more I attend "craft night" I realize its more just ladies night out together.  And I thank Carver for being so difficult with that first day of potty training that inspired me to flee the house to that first craft night.  Its been a real treat to start regularly attending.

Anyway,  I pulled into the driveway and walked in the door to find my baby sleeping peacefully upstairs and Joshua and my little Carver snuggled up, asleep on the couch.  I picked Carver up and put him in his bed and came back down for some toast and to check on Josh.  You see he has this habit of falling asleep on the couch and waking up at 3 in the morning still there and hobbling up to bed.  He woke up and we chatted for a bit.  I caught him up on all the church lady gossip from my evening with the ladies and he filled me in on all the funny things the boys did while I was away.  Asher had a hard time getting to sleep and Carver snuggled next to him watching netflix shows while Josh tried to get caught up on the latest book he and Mady are reading together so he could be prepared for their next Skype session where they quiz each other about it.  A good night all around.

Eventually I looked at the clock and told him I wanted to work a little more on some projects upstairs but ended up reading some blogs and came across this one.  It was so beautiful and so heartbreaking and when I read stuff like that I just think, what am I doing up, alone?  Why aren't I cuddling my loved ones close and cherishing how blessed I am to have them with me, to hold and kiss and hear their sweet voices.  Does anyone else ever feel guilty for the time crafting and quilting or whatever your hobby is taking you away from your loved ones?  I know its silly and I know that I really need this "thing" that's mine and my creative outlet.  And for heaven's sake most of everything I make is FOR THEM but its posts like that that make me think of the times I'm shooing my kids back to their toys as they climb on me as I try to sew, or hurrying through bath time or bedtime so I can get to my projects, or sitting up at midnight blogging (like right now) as my sweet husband is down on the couch waiting for me to come tell him I'm off to bed.

Am I the only one that feels this conflict?

Anyway, it got me thinking, not sewing and so as such, no picture.  Just thoughts tonight.  And shutting things down to go kiss my babies and tell my Joshua to come on up off the couch so I can cuddle him and feel how lucky I am to be able to do that.

Head over to the Auction for Valerie or check out her blog and read a little of her story.

Tuesday, March 1, 2011

Single Girl Quilt Quilt-a-long: First Block Done!


I got my first block on my single girl quilt done!  Whoopee!
1 down, 19 more to go.

Yes, I'm making a KING SIZER.  

For reals.

This is going to take s o m e  t i m e.

But finishing that first block and seeing how it all came together, gets me revved to knock out a couple more.

How beautiful is that going to be when its all done!

Beautiful and HUGE.

I'm thinking this one is going to have to wait till this summer for quilting when I can get up to my favorite quilt shop, Bayside Quilting, where I can rent out some time on the long arm.

And while we're on the subject, why don't more quilt shops do this, rent out time on their long arm?

Anyway.  
I've got more single girl curvy seams to do.
Related Posts Plugin for WordPress, Blogger...