Sunday, August 28, 2011

For the love of grandmas....

For the last few weeks I've been working away on two projects for the same new grandma.

One of my mom's best friends just became a grandma this summer.  She initially asked me to create a quilt for the baby and then in secret my mom asked me to create a "grandma" quilt for her friend to keep at her home to be the special snuggle quilt at granma's house.

The first quilt for the baby came together easy.  I love the fabrics and I loved how the embroidery came together on the back.  I just loved it.


I really struggled with finishing up this little number.  I loved the top but couldn't find the right back for it.  I finished the other one first and called my mom to tell her that I loved the baby's quilt more than hers.  I just couldn't finish it up in a way that I loved.  Then I decided to try a different way to finish it by just folding the backing over.


And now I love it too.  LOVE IT!  It has a SUPER high snuggle factor.  Like a 10 out of 10 snuggle factor.

I google translated a bunch of different ways to say grandma and appliqued them on to the front of the quilt.


Mom had the shower this weekend and presented her friend with both.  Yay!  

Today I'm linking up with:  
  {Sew} Modern Monday at Canoe Ridge Creations   The Girl Creative


Friday, August 26, 2011

Cog and Wheel Quilt-A-Long {Part 3}

Please forgive the delay.

I really can't offer much of an excuse except that these days my day job 
(mama to these monkeys)
has been keeping at off site locations like the park and swim lessons and running up and down the street.  In other words away from the sewing machine and the computer. Which is a good thing!

But enough is enough so without further ado, lets finish this up!

FINISHING THE COG AND WHEEL

Lay out blocks.

To sew them together, match up the seams in the middle of the block to make sure everything lines up.


Sew all the blocks together with a 1/4 inch seam

If you are doing the twin sized quilt, you are done.  If you are doing any of the others, take your boarder pieces and following the cutting/sizing directions in the pattern, sew on the boarder to the top and bottom of your quilt top.

At this point make sure to iron up the top once you have it all sewed together.  With all the curvy sides a good iron job will make sure everything gets nice and flat.

If you are planning to machine quilt this guy on your own machine or hand quilt its time to, create your quilt "sandwich."
Lay out your backing, then your batting on top of that and your quilt top on top of that. 

With each layer make sure you smooth out all lumps and bumps.  I like to use a spray baster to lock the fabrics in place.  Depending on how large your quilt is, go ahead and baste with thread as well.

If you plan on using the quilting pattern in Denyse's actual pattern, now is the time to take it out. 

In order to trace the pattern onto the quilt top a great demonstration of the method can be found here.

I've yet to decide how I want to quilt mine and also yet to find the right fabric for backing it so I don't have a finished product to show off.  Here's the top though!


Good luck finishing yours!  When you do I'd love to see!

Sunday, August 14, 2011

A delay and a little show off.....

Today was supposed to be our next installment of our Cog and Wheel Quilt-A-Long

But I'm afraid the week has gotten the better of me and I am not really any closer to being ready to start the finishing work on this quilt than I was this time last week.  What can you do.  I suspect maybe any of you who are quilting along might be in the same boat since a week is kind of a short amount of time to get all those blocks together unless you are doing a baby quilt in which case I suppose you'll still understand.  I've got two custom orders to work on that need to be finished and then there was the matter of finishing up this little beauty above that was begging me politely to finish the quilting and get it bound so I could get it on my bed.

So there you go.

And there she is.  All finished!  I'm so happy to have it finished and laid out nicely on my bed.  I love it.  I REALLY really love this quilt!

Now I think it needs some colorful throw pillows.  Put that on the long list of projects I want to do....  It will also take some convincing since the husband isn't a fan of throw pillows.... we'll just have to see about that!

yay for me:)

We'll recommence together this time next week for some finishing work on our Cogs and Wheels......

Sunday, August 7, 2011

Cog and Wheel Quilt-A-Long {Part 2}

Hello!  This week we'll go over piecing.  This really is the tricky and most intimidating part. 

Once you have down the technique for curved piecing, you'll think to yourself, 

"oh my this is fantastic! give me more curves!  Bring on the Single Girl!"

You'll laugh in the face of a double wedding ring.  Right in its face.  I promise you.

But back to the matters at hand.
our Cog and Wheel.

Step 1: LAY OUT YOUR BLOCK
I find that laying out my block is a must for the cog and wheel.  Usually I'm not really interested in strictness in laying things out before I sew and as you might expect, I often end up with blocks pieced in all sorts of "new and creative" ways that I didn't intend.  Sometimes this is nice, not so much with curved piecing.  I also recommend putting on an episode of Say Yes to the Dress on your iPhone as you can see I did.  Each block is two and a half episodes for me:)


Step Two: PIECING THE CENTER STRIP
It doesn't really much matter which section you do first but I look at them as five sections illistrated below to keep my brain from tying in a knot and getting things sewn on wrong sides or upside down.  It also allows me to chain piece to a certain extent which moves the process along a tad too.

Section 1 would be the center strip (or pieces 2 and 4 in your pattern)  The top of piece 2 is curved and matches the bottom of piece 4.  When you try to put right sides together to sew it, they obviously don't match up because of the curve so start by placing the right sides together, lined up just matching up the ends as pictured.  Stitch a few stiches and then put your needle down and lift your presser foot. 


Adjust the next small section so that it matches up and sew a few more stiches.  Continue this process till you get to the end.  The end will be a little tricky and you will have to sew and really hold the ends together slowly but don't get too caught up on perfect matching up here.  This piece is pretty forgiving.

CAUTION:
I'll say this a million times more for this part.  Because you are sewing with fabric cut on the bias (against the grain of the weave of the fabric) it is super stretchy and easy to really pull the fabric out of shape and end up with extra or short on a side.  Just bring the fabric up to meet the piece you are matching it up with gently.  A teeny tiny 
tug is okay but don't pull or stretch.

Step 3: Piecing the curved sides
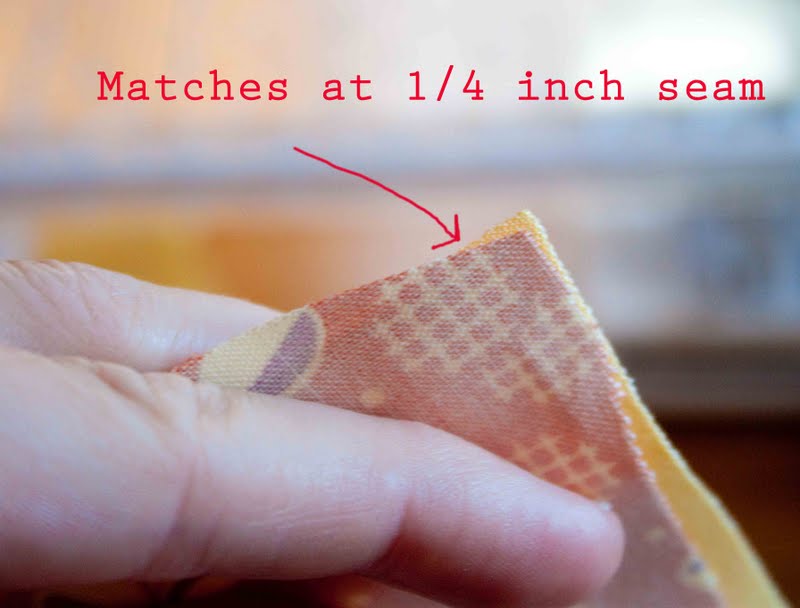
Sections 2 and 2b are easy and match up like any square piece would except on the curved end you will find that the piece of the fabric that matches up is on the point of the fabric that will be the 1/4" seam.
(see below)
If you start sewing on the curved side, that's what will match up.  If you are sewing on the 90 degree angle side, it matches up like any square piece does.


Once you sew it, it is even on the curved sides
(see below)

Sections 3 and 3b are the same in that you just make sure the places the fabric matches up is where the seam will be at 1/4 inch. (the pictures above are from piecing sections 3 and 3b).  These two parts really lend themselves well to chain piecing.

Once you have all five sections pieced together, its time to turn them into three parts from the five.  You will sew sections 2&3 together and 2b&3b together.

Step 4: Piecing your first big curves
Lay them out again like so.

Fold them in half and pinch the crease to mark it.  
Match the crease and pin it.
Match the seams and pin those.
Continue to pin in half and match creases until pinned all the way.

CAUTION:
To all those out there who are not usually big pinners, let me take this moment to encourage you to pin just this time.  Again because you are using fabric cut on the bias, it is WAY to easy to stretch and pull the fabric so that you end up with things way off and not matching up.

JUST PIN IT!

 Step 5: Sew ALL sections together
This is the easy one.

Step 6: Sewing the outer corners onto the inner circle

Take four corner pieces and sew them into a circle.  It will look like a square that just had a circle cut out of the center.

Fold center circle into half and then fourths  to crease fold to mark centers of pieces. You can even throw a pin onto each of these creases to mark them and be ready since you will be pinning together there shortly.


Match up the seams of your outer corner piece to the crease in the center of your inner circle piece 
(pictured below)

Create the same fold/crease in the center of your next patterned piece (piece #4 in the original pattern) and make a correponding crease in the middle of the outer corner piece.  This can be done easily by folding the corer in half as if it were a square)


Once you do that all the way around it will look like this.  May I just take this opportunity to really encourage you to pin this really thoroughly all the way around.  It will make it much less likely that you will end up with puckers or pockets where the fabric bunched up or stretched.  
Pinning is way less tedious that picking out your stitches.

something about this picture makes me want to bake an apple pie.....

Once you get that bad boy all pinned up you can just sew all the way around.  Take time and go slowly to keep things from bunching as again, bias cut fabric can be persnickety. 


There you have it!  You're done!


Tune in next Monday for finishing......

Sunday, July 31, 2011

Cog and Wheel Quilt-A-Long {Part 1}


Goodbye July, 
hello Cog and Wheel Quilt-a-long!

Oh how I've been looking forward to really diving in to this pattern. Here we go!

What you'll need today:

-Your Cog and Wheel pattern
-your assortment of fabrics
-quilters template plastic 
-marking pens/pencils
-permanent marker

I like to streamline my piecing process as much as possible so my instructions will follow along that mindset.  I will say, however, that this pattern, more so than the single girl, does lend itself well to cutting out your pieces as you go block by block if you decide to go that way. 

1.  Pre-wash your fabrics 
(if you want to, I don't.  I like it to shrink up a little once its quilted to give it more of that antiqued look but if you are a pre-washer/ironer/starcher, now is the time to do it)


2. Cut out your templates.
First of all do NOT cut your templates out of the pattern page.  Pick yourself up some quilters template plastic (its cheap as can be at your local craft store) and trace it with permanent marker.  Its WAY easier to work with than the paper and you save your pattern (which is particularly important if you intend to hand-quilt your quilt).


Make sure you label them once you cut them out.  Many of the pieces are quite similar and you don't want to confuse them.  It also helps so that when you trace on your fabrics, you know you are tracing on the correct side.

3. Trace your templates onto your fabrics.
I started with my background fabric since its the biggest fabric piece and most cumbersome to deal with.
I was able to fit one 5R piece in between two the outside pieces which isn't how Denyse did it in her original layout but I'm all about squeezing as many pieces out of my fabric so I can minimize leftover bits.

4. Cog and Center pieces
To cut out my cog pieces I took all the fabrics I was using and cut them into sets of four 4.5" squares so I could mix and match which fabrics I liked in which combinations.  

I did the same thing with the center pieces.  I chose 9 fabrics that I wanted to use for my center pieces and cut one 4.5" square of each.

Once you have your squares, take a pile and the corresponding template, trace it on the top piece and cut all four while stacked up.

MAKE SURE: you have the template facing the proper direction.  I traced on the back of my fabrics so I used the template backwards.

Then get to cutting!

Feel free to email me with any questions!  
silverlilysews@gmail.com

Next up on 8/8: Piecing and sewing those curvy curves~~~~~~~~


Friday, July 22, 2011

Just popping in for a minute...

I remember loving fabric and sewing and all things crafty as a kid but since my mom wasn't really that way, I never felt that that desire was really encouraged.  And in fact since both my parents have fabric store "issues" from their own childhoods that was just never a path I really got to do anything with until I was married and had time and a little money to explore it on my own.  (sorry mom, I know you're reading this and feeling the guilt......) Anyway,

So when Mady came to us this summer and announced that when she grows up, she has decided to become a fashion designer, I could tell this was something she was really excited about.   So in an effort to encourage her dreams, the next day she and I went to the library and checked out a few books about design which she studied and poured over the whole first night and then on the 15 hour drive up to Washington and 6 hours to Idaho where we spent the last two weeks.  Once up there we picked up her favorite Taff cousin and the girls began talking about how Mady was going to design Ashley's prom dress someday.  Then yesterday the girls decided that they wanted to take a trip to Goodwill on their own.  Its only about 100 yards from the house so we said have fun and be back in a half an hour.

And they came back having spent $50 on a wedding dress.

A big, white, fluffy wedding dress at least two sizes too small for Ashley.  They announced that Mady was going to alter it into a prom dress for Ashley.

"uh.. okay," I said, "how much did that cost?"

"Don't worry about that!"  They told me.  "We're going to make it into a prom dress! It will be a dress fit for a princess!  It will be so beautiful!"

When I told Joshua initially lets just say he was not pleased. He had stopped by Goodwill on his way back to work to check on the girls and apparently they were trying it on and he told them it was a bad idea since A. it was a wedding dress and B it was too small for the intended wearer.

But since they came home with it they have been holed up in Mady's room with a seam ripper and a million ideas and have been hacking the thing to bits.  Last night they were up late googling you tube videos about wedding dress transformations and then this morning they asked me to help them with their idea to address the size issue.


The girls worked really hard and Mady sewed on little loops to do sort of a corset lace up back.  It was fun sitting with her and showing her how to use the sewing machine and helping them figure out ways to execute their ideas. We even put an episode of Project Runway on in the background to inspire us.


The next step was to address the way to long length of the dress.  It was with a cringe in my heart that we took Grandma Linda's sewing shears to the satin but it had to be done and the end result was pretty good.


We took a break for lunch and met up with Joshua and some of his work buddies for what they call *Cardio Club and as we were driving to the Dairy Queen I told him about our morning.

"Its like how you always said that when the boys got older you'd buy them old washing machines or engines to take apart and put together again to learn how to fix stuff, " I told him, "I think this is the same thing only girlier and with fabric.  Its really a good thing that they blew all their spending money on this.  This is a memory."

This annalogy seemed to speak to him and then I told him how all morning I keep overhearing them giggle to each other and say, 

"this is so fun!" 
"I can hardly believe how fun this is!"
"You are going to look so beautiful!"
"I feel like a princess!"

along with other such phrases that really are what summer vacations should be filled with.

*The Cardio Club is a group of Josh's work buddies that go out to lunch on Fridays to places that will give them all sorts of Cardiac problems, favorites are Costco for pizza and hot dogs, Taco Bell, Dairy Queen and Burger King.  At first when Josh mentioned it I said, "oh great!  you are going jogging during your lunch break!  good for you!" and he said, "no, its doing stuff thats BAD for your heart.  Its BAD for your cardio club." 

Monday, July 4, 2011

Gone Fishin'

Or something like that. Our Mady girl arrived Friday morning bright and early and since then there has been a non stop flury of family fun which has left little time for me to even remember I have this blog.

Hence the forgotten Finished It Up Friday.

I wondered how this bloggery would go with Mady and the husband home and all the activities and it appears it would be best to just call it an official blog-cation and relieve myself of the guilt. Why do I have guilt? I don't know. Let's just say I'm out of the office until August 1st when we shall commence with the cog and wheel quiltalong.

Happy July!
Related Posts Plugin for WordPress, Blogger...